


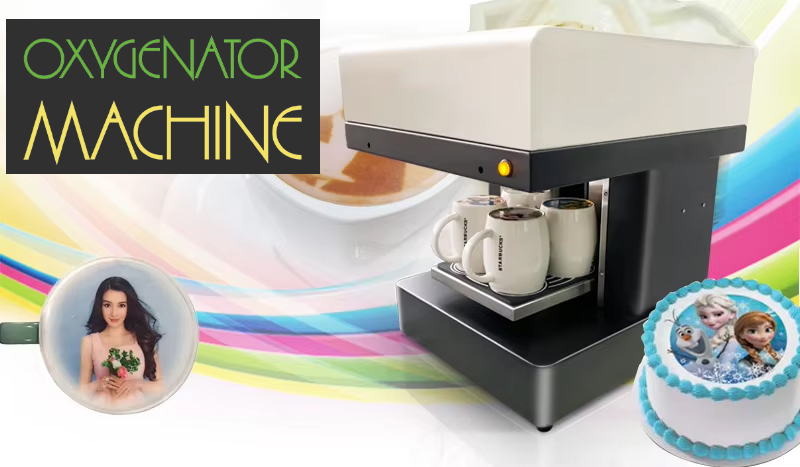
Smart Coffee Printer For Food Decoration
€2,069.44 AUD
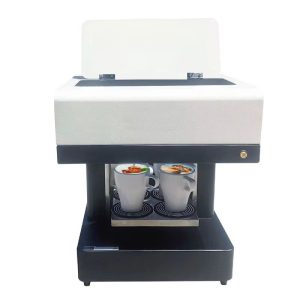
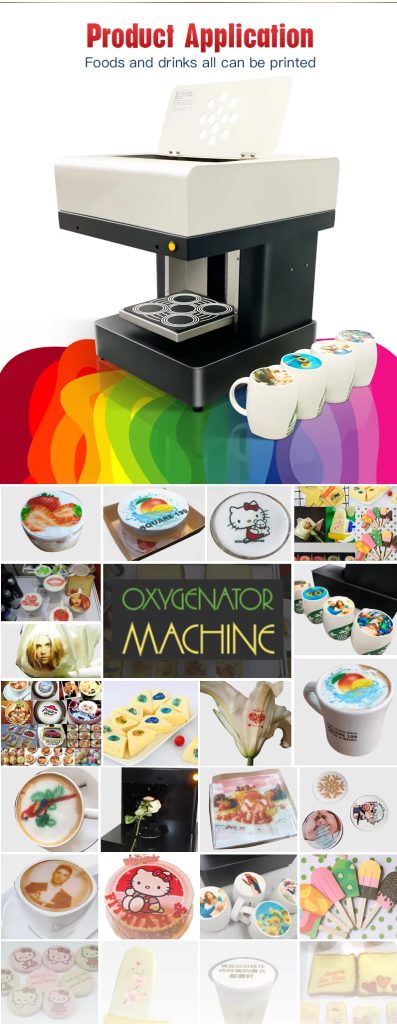
Bring creativity to your café or kitchen with this Smart Coffee Printer—a professional edible ink printer designed for food-safe, high-quality printing. Perfect for coffee shops, bakeries, restaurants, and event businesses, it allows you to print photos, logos, or messages directly on coffee foam, chocolate, bread, and more.
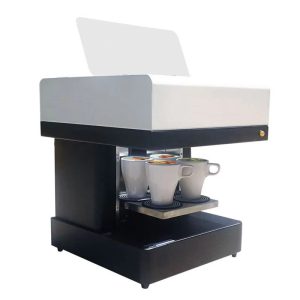
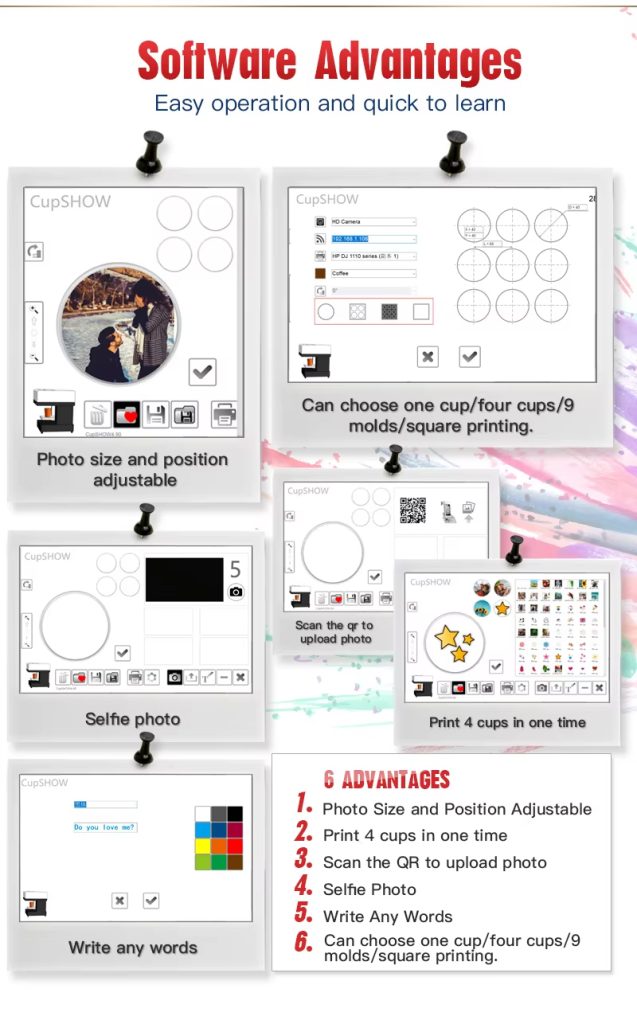
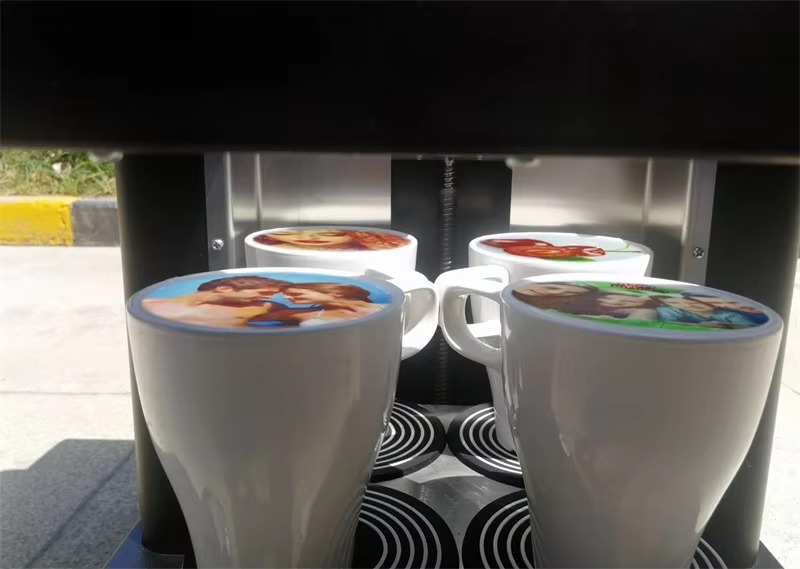
Featuring automatic height adjustment and a maximum resolution of 600×600 DPI, this printer delivers crisp, vivid images in just 10 seconds for 4 cups. Its intelligent printhead self-protection system ensures reliable, long-lasting performance. Compatible with both Windows and Mac operating systems, this compact and efficient printer adds a unique, eye-catching touch to any beverage or dessert presentation.
All listed prices include applicable taxes and service charges.
Description
Introducing Our State-of-the-art Smart Coffee Printer For Food Decoration
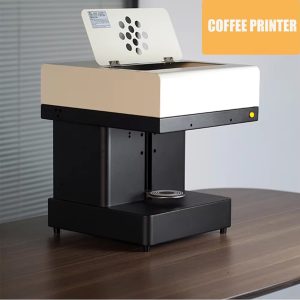
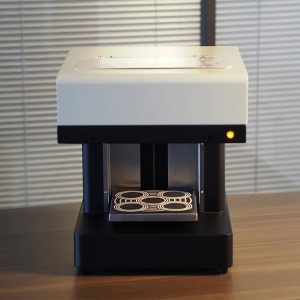
Elevate your café, dessert bar, or food-service setting with this state-of-the-art Smart Coffee Printer For Food Decoration —an edible-ink flatbed printer engineered to decorate beverages and food items with full-color photographic precision. Whether you’re personalising cappuccinos, hot chocolates, cakes, or confectionery, this machine enables you to print custom images, logos and messages directly onto edible surfaces in seconds, delivering memorable presentation and guest delight.
Key Features:
-
🍵 Edible Ink Printing for Food & Beverages – Safely print photos, logos, or designs directly on coffee foam, chocolate, bread, and more using food-grade edible ink. Perfect for cafés, bakeries, and restaurants.
-
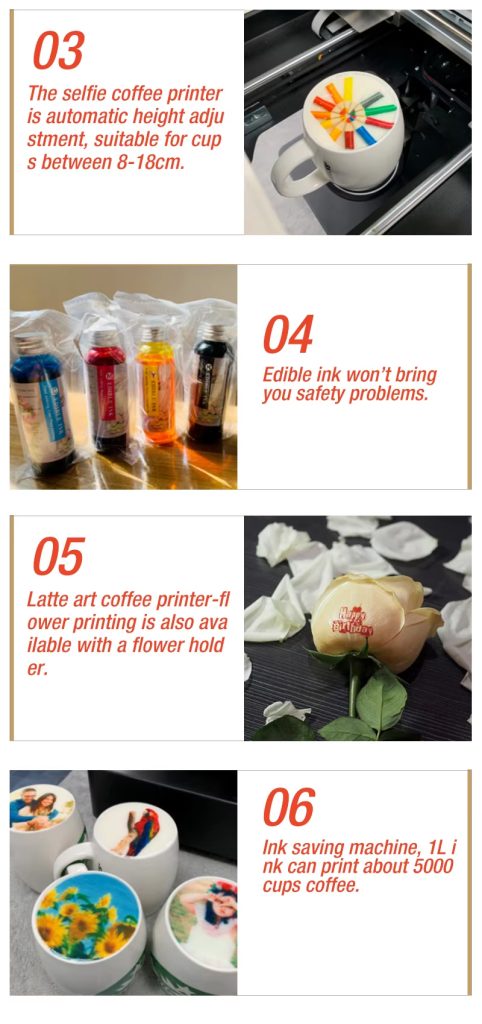
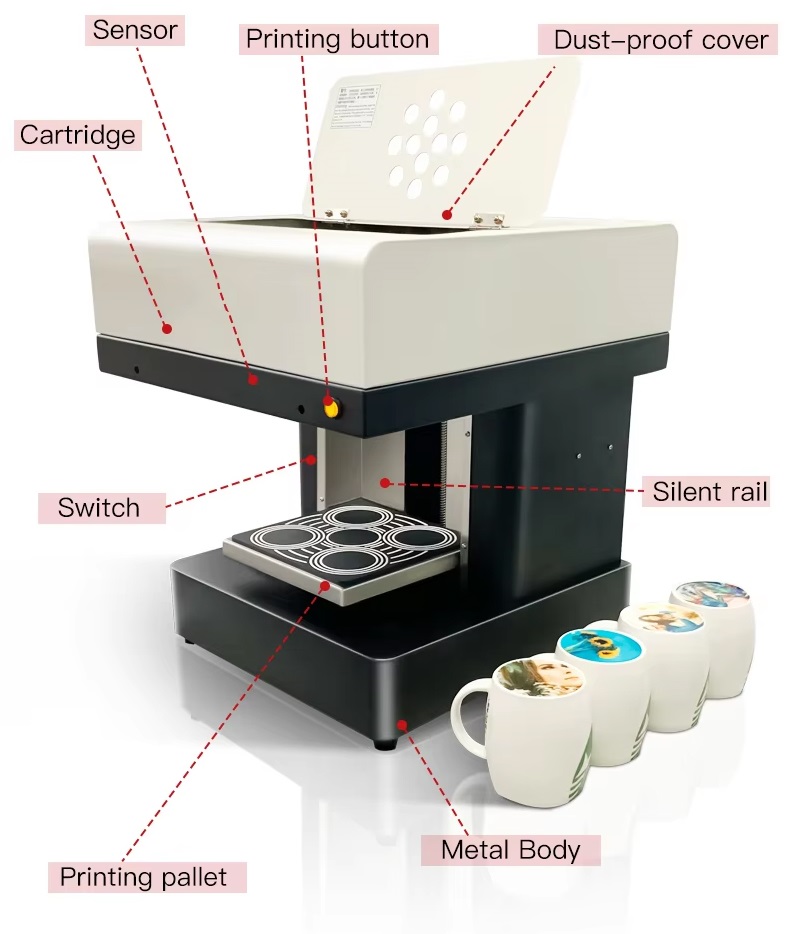
⚙️ Automatic Height Adjustment – Intelligent sensor control automatically adjusts the printhead distance for different food surfaces, ensuring clear, distortion-free prints every time.
-
🎨 High-Resolution Performance – Achieve vibrant, photo-quality prints with up to 600 × 600 DPI resolution.
-
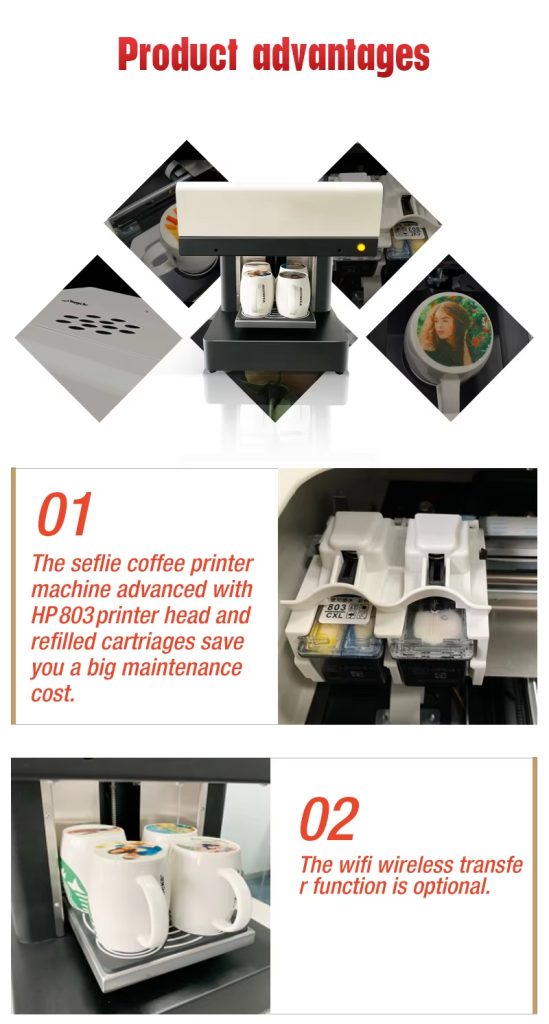
📱 Smart Printhead Protection – Built-in self-protection technology prevents clogging and extends printhead life, ensuring reliable performance and lower maintenance costs.
-
💻 Wide System Compatibility – Works seamlessly with Windows and Mac computers. Compact, easy to operate, and ideal for professional or commercial use in coffee shops, events, and creative food businesses.
-
🚀 Fast Print Speed: Capable of printing up to 4 cups or items in approximately 10 seconds (varies by surface & setup), boosting speed and productivity.
-
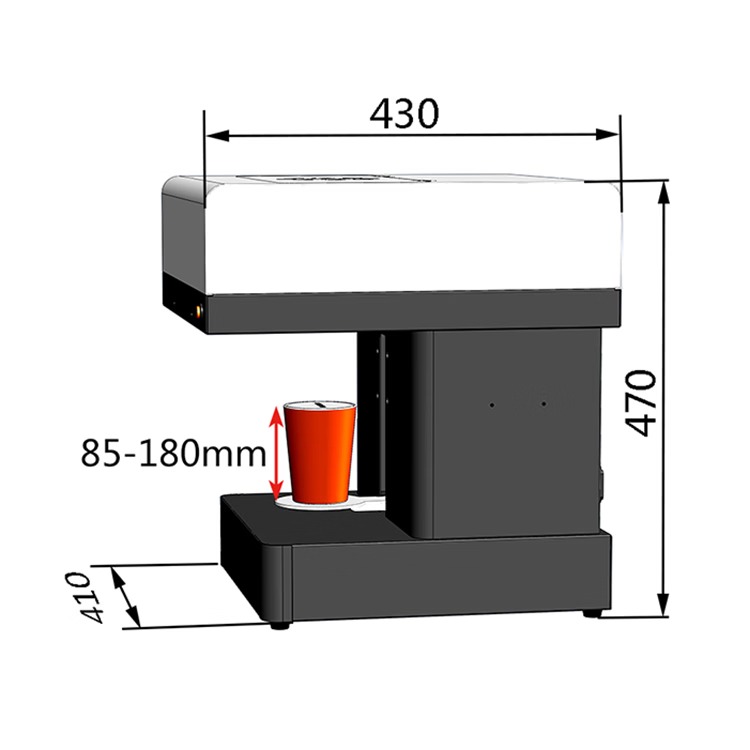
💥 Variable Object Size: Supports printing on objects up to roughly 20 × 20 cm; machine dimensions about 41 × 34 × 47 cm.
-
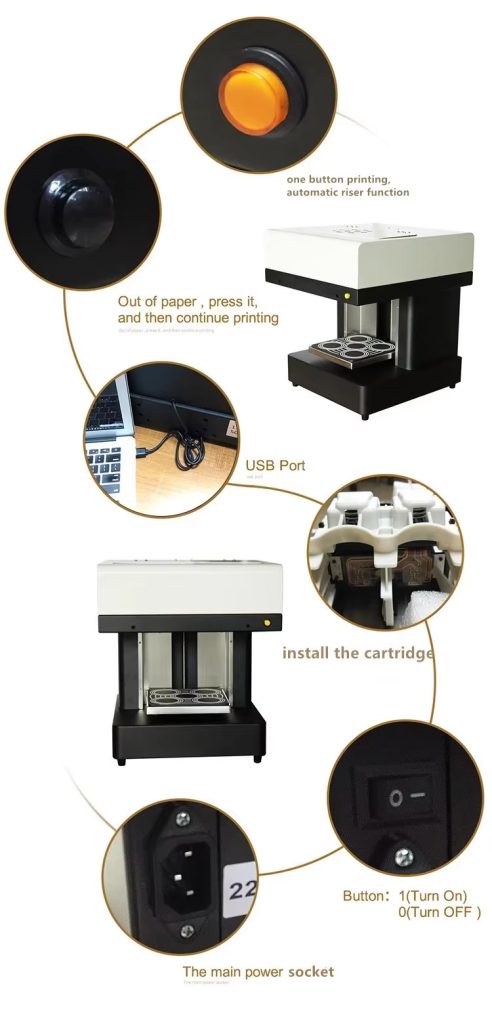
🤖 USB Interface: Easily connect to a computer to upload your designs via USB (may support other interfaces depending on model).
Ideal Applications:
-
Coffee shops wanting to offer “selfie-on-your-latte” services.
-
Dessert bars, pastry counters, or bakeries customizing cakes, cookies, macarons.
-
Candy or chocolate manufacturers adding personalised prints to product surfaces.
-
Cocktail bars producing customised drinks with pictorial logos or greetings.
-
Promotional or event catering setups seeking unique food-print branding.
Why Choose This Printer?
-
It adds an unforgettable “wow” factor to your product, helping attract social-media attention and enhancing guest experience.
-
It offers high flexibility and ROI by converting everyday beverages and foods into personalised, print-ready canvases.
-
The relatively compact footprint (approx. 41 × 34 × 47 cm) means it can fit on countertop space without requiring industrial-scale infrastructure.
-
The supplier provides strong support including replacement parts and customisation services, which is important for commercial deployment.
Operation & Maintenance Tips:
-
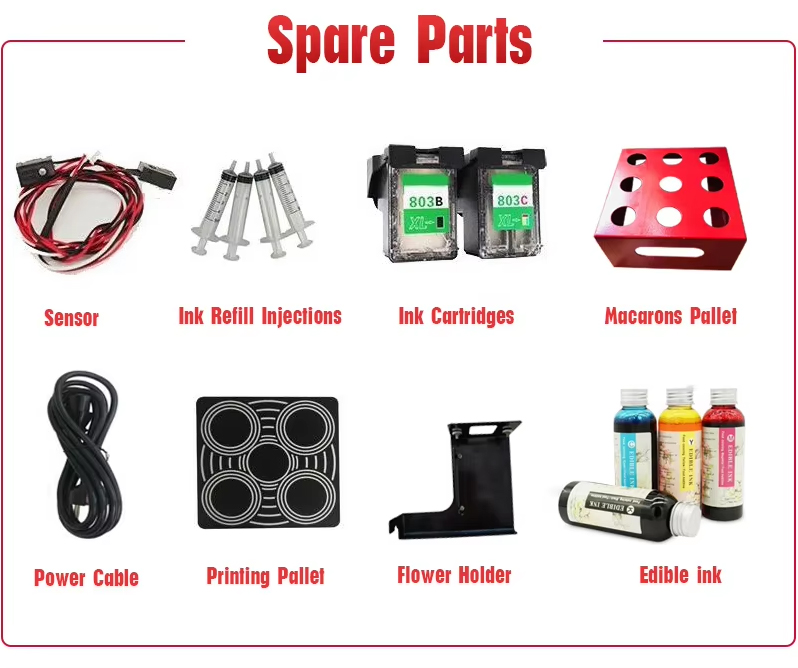
Use only approved food-grade edible ink cartridges to maintain print quality and ensure food-safety compliance.
-
Regularly calibrate and clean the print head and nozzle to avoid clogging from food-residue build-up.
-
Perform periodic print-head test patterns and clean-cycles, especially if usage is intermittent.
-
For best results, ensure your target surface (foam, chocolate, bread, etc.) is as flat and even as possible, and maintain consistent distance between print-head and item surface.
-
When printing items for commercial sale, test print time and throughput to ensure your equipment meets service-volume demands.
-
Ensure the ambient environment (temperature, humidity) is appropriate for food-safe equipment and glass-top or flatbed surfaces remain clean and uncontaminated.
Specification
| Item | Details |
|---|---|
| Printing Type | Flatbed inkjet printer for food/edible use. |
| Max Print Resolution | 600 × 600 dpi |
| Max Printing Size (object) | 20 × 20 cm |
| Voltage | 110-220 V |
| Machine Dimensions | 41 × 34 × 47 cm. |
| Ink Type | Multicolour edible ink |
| Net Weight | Approx. 18 kg (gross about 26 kg) |
| Operating System Compatibility | Windows 95/98/NT/2000/XP/Mac (per listing) – note: ensure modern drivers for current OS |
Experience Elegance in Relief: Your Smart Coffee Printer For Food Decoration Solution

🧭 Use Instructions
Preparation & Setup
-
Unpack and inspect the machine
– Carefully remove the printer from its packaging. Ensure all protective films / locking pins are removed (especially around the lift arm and height sensor).
– Place the printer on a stable, level countertop with sufficient clearance above and around (for example: at least 30 cm above for the lift arm movement). -
Connect power and interface
– Plug the printer into a suitable power outlet (confirm voltage compatibility).
– Connect your computer (Windows or Mac) to the printer via USB or other supported interface. Install any driver or software if required. -
Install the edible ink cartridge
– Open the cartridge compartment. Remove the protective cap or film from the nozzle of the edible ink cartridge.
– Insert the cartridge into its slot gently (do not force).
– If the system asks for a cartridge code or serial number, input as prompted. -
Position target items
– Choose the item you want to print on (e.g., a coffee cup with foam, a chocolate slab, or a slice of bread).
– Place it centrally on the print bed/under the printing head. If the object is in a cup or glass, ensure the foam surface is level and reaches near the rim so the height sensor can detect correctly.
Operation – Printing Process
-
Select or upload your design
– On the connected computer, launch the printing software. Upload the image (photo, logo or text) you wish to print.
– Adjust size, orientation, brightness/contrast if needed to suit the material surface. -
Automatic height adjustment
– Initiate the height calibration: the lift arm will raise until the height sensor detects the object’s surface and automatically stops.
– Confirm the height reading or fine-adjust manually if your material has irregular thickness. -
Start print job
– Choose the print mode (for example: “Coffee – Foam”, “Bread”, “Chocolate”) or manually select material type.
– Click the Print button. The printer will then perform the print:
• Lift arm moves into position.
• Print head travels across the surface and ejects edible ink with precision at 600 × 600 DPI.
• For reference, it can print 4 cups in approximately 10 seconds under optimal conditions. -
Completion
– Once printing finishes, the lift arm will lower. Retrieve the item carefully.
– Inspect the printed result: the image should appear crisp, well-aligned, and adherent to the food surface. If not, review settings or calibration.
Maintenance & Cleaning
-
Daily nozzle/print-head cleaning
– After use (or at least once every 24 hours), wipe the print-head nozzle gently with a lint-free cloth to prevent edible-ink drying or clogging. -
Cartridge storage
– If a cartridge will remain installed but unused for several days, wrap the nozzle end in cling-film and place upright at room temperature to prevent drying. -
Material-specific inspection
– For printing on items such as chocolate or bread, ensure the surface is dry and stable—avoid printing on very soft or unstable surfaces which may shift during printing. -
Software & driver updates
– Periodically check the manufacturer’s website for firmware, driver or software updates for Windows /Mac compatibility and performance improvements.
Safety & Best Practices
-
Always use food-grade edible ink cartridges approved for the machine and comply with local food-safety standards.
-
Do not reach into the housing of the machine while it is operational (lift arm or print head may move unexpectedly).
-
Ensure the print area is free of moisture, debris or loose items that may interfere with sensor operation or print quality.
-
Avoid using objects larger than the machine’s maximum supported area (e.g., approx. 20 × 20 cm) to prevent misalignment or mechanical obstruction.
-
In the event of recurring printing defects (e.g., streaks, missing colours, misregistration), stop operation and perform full calibration or consult troubleshooting documentation.
⚠️ Cautions and Precautions
1. Safety Precautions
-
Use Only Edible Ink:
Always use food-grade edible ink cartridges designed specifically for this printer. Non-edible or third-party inks may cause health risks and damage the printhead. -
Power Supply Safety:
Confirm that the power supply voltage matches the machine’s rating before plugging in. Avoid using damaged power cords or loose outlets. -
Do Not Touch Moving Parts:
Keep hands, hair, and clothing away from the printhead and lift arm while the printer is operating to prevent injury or malfunction. -
Avoid Moisture Exposure:
Do not spill water, coffee, or any liquid on the printer. Keep the machine dry to prevent short circuits or electrical damage. -
Child Safety:
Keep the printer and edible ink cartridges out of reach of children. The printer is not a toy.
2. Operational Precautions
- Stable Placement:
Place the printer on a flat, stable surface to ensure accurate height detection and consistent print quality
- Height Adjustment:
Always allow the automatic height detection system to complete its process before printing. Manual interference may damage the sensor.
- Proper Object Positioning:
Center cups, chocolate pieces
Our product is built to last, offering dependable performance for a generally trouble-free period of three to five years. Regular maintenance can be conveniently done at home – simply use a cotton bud to clean the air intake and filter to remove dust.
Reviews (0)
Only logged in customers who have purchased this product may leave a review.
Reviews
There are no reviews yet.